 |
| Large bunch of Spinach harvested from our Garden. |
Freezing is actually a really great way to preserve vegetables from your garden. Freezing allows you to preserve most of the nutrients and also helps to maintain the color and flavor.
 |
| Three bowl set up for freezing homegrown spinach. |
For most vegetables blanching and cooling is a necessary step to properly preserve them. Blanching stops the enzyme action that helps vegetables to grow and mature.
I used a three bowl set up to blanch and cool my spinach very quickly. It only took me about 20 minutes to do the whole batch.
 |
| Blanching Homegrown Spinach. |
 |
| Cooling Spinach after blanching. |
 |
| Draining water off of blanched and cooled spinach. |
Of course the first step is to thoroughly wash the spinach, cut off thick stems and take out any bad leaves. Then you can start the blanching process.
The first bowl is for blanching. I have a large stock pot with a colander that fits inside, perfect for blanching. But you could also scoop it out with a slotted spoon. Bring the water in your stock pot to a boil. Then add your spinach. I did several small batches because you want your spinach completely covered with water. Cover the pot and blanch for 3 minutes.
Remove your spinach promptly after 3 minutes and put it in a bowl full of ice water. I placed a colander inside a larger bowl of ice water for quick and easy transfer. Allow the spinach to cool for the same amount of time. If you are doing several batches be sure to change your water or add more ice to keep the water cold.
After cooling I transferred my spinach into another colander placed over a bowl to allow it to drain. After it drained for a bit I used my hands to squeeze out the remainder of the water.
 |
| Blanched, cooled, and drained spinach all ready for freezing. |
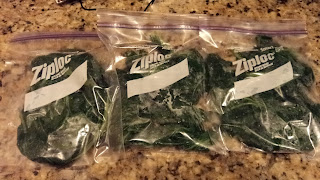
After my spinach was blanched, cooled, and drained I placed it into Ziploc bags. Here they are all ready for the freezer. I got three quart sized bags of spinach from my garden that day. I was very excited. It was much easier than I thought and didn't take much time at all.
Remember that each type of vegetable has a different blanching time to prepare it for freezing. If you want to freeze other types of vegetables there are various places you can find time charts. Here is one from the Colorado State University Extension. Freezing is another way we can preserve some of that great garden harvest. Happy Freezing!
Also remember this great water conservation tip and use all that great spinach water to water you household plants and pots.
No comments:
Post a Comment